

Hi everyone & welcome to the first of our August Design Team 'Moment To Shine'
tutorials - they are a little extra treat for you so that you are not only inspired at SATW
but also practically educated too. We want to equip you to be able to scrap like a pro!
Today we have a step by step photo tutorial by Design Team member Dorota Dolega,
from France using our current challenge here. Dorota shared a sneak peek with us
during our mid month reveal & now we get to see the full layout & the process
behind the making of it!
from France using our current challenge here. Dorota shared a sneak peek with us
during our mid month reveal & now we get to see the full layout & the process
behind the making of it!

Dorota created her beautiful layout based on the mood board
below & will share her creative process with us in the photos below.

Let's get to know a little bit about Dorota!

Hello, my name is Dorota Dolega. I come from Poland, but now I live with my husband
& two kids in Gif-sur-Yvette, a small town about 30 kilometers outside of Paris.
I have been a passionate paper crafter for about 4 years now.
My favourite ways to express myself on paper are through layouts & art journaling.
My style is minimal although I am always learning & trying to improve.
I love gesso, textures, layers & monochromatic colour palettes.
My favourite colour combo is black, white & grey.
I find inspiration in photography, painting & nature.
When I'm not crafting or trying to protect my house from being demolished by children,
I'm probably climbing rocks in the Forest of Fontainebleau ;)
Please feel welcome to visit my blog here.
------------------------------
1. Start by working on the background.
Apply some paint (turquoise & metallic blue) with a rubber brush/old credit card.
When the paint it almost dry, apply modeling paste or heavy gesso through a
stencil over the painted areas &randomly all over the page.
Apply some paint (turquoise & metallic blue) with a rubber brush/old credit card.
When the paint it almost dry, apply modeling paste or heavy gesso through a
stencil over the painted areas &randomly all over the page.

2. When it's dry add more colour with mists.
Start with the lighter colours first then add darker, without leting the lighter one dry,
so the colours are blended. When the mists are dry, add some stamping with 2
colours of ink - black & turquoise, using your hand instead of a stamping block, for a more
distressed effect. After this step I attached the paper layers to the background with foam tape.
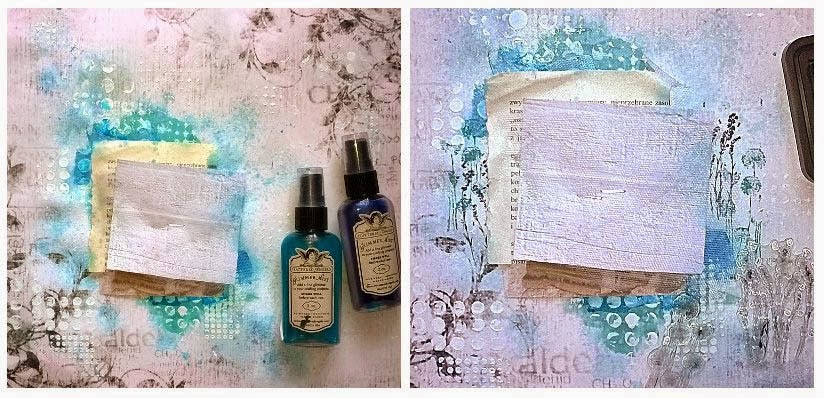
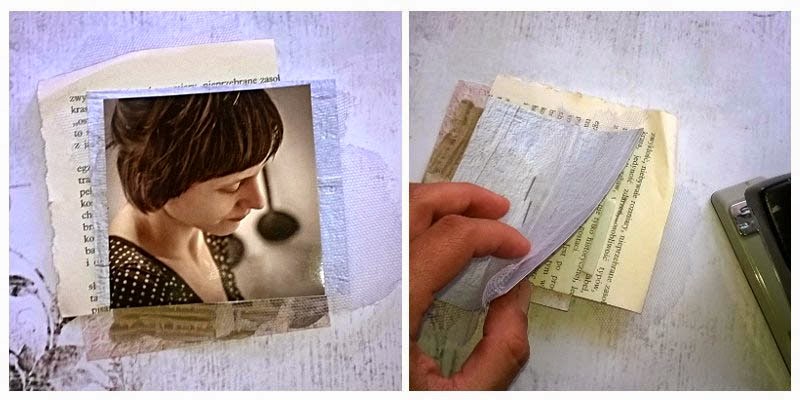
3. Add some splashes around the photo with white ink & blue watercolor paint.
Placed some tangled thread under the photo then apply some double-sided
foam tape to keep it in place as well as adding dimension.

5. Finish the layout with some embellishments. (a fabric flower torn from some
Bloomers tape). Add your title, some torn washi tape & some clear gems
& sequins scattered around the photo. The layout is ready!

It is simple & made with no advanced techniques, so I hope this tutorial
will be useful for those scrappers who have just started their adventure.
Simple is always best!
Start with the lighter colours first then add darker, without leting the lighter one dry,
so the colours are blended. When the mists are dry, add some stamping with 2
colours of ink - black & turquoise, using your hand instead of a stamping block, for a more
distressed effect. After this step I attached the paper layers to the background with foam tape.
3. Add some splashes around the photo with white ink & blue watercolor paint.
Placed some tangled thread under the photo then apply some double-sided
foam tape to keep it in place as well as adding dimension.
4. Your layered stacks should also include some old book paper & tulle stapled together.
5. Finish the layout with some embellishments. (a fabric flower torn from some
Bloomers tape). Add your title, some torn washi tape & some clear gems
& sequins scattered around the photo. The layout is ready!
It is simple & made with no advanced techniques, so I hope this tutorial
will be useful for those scrappers who have just started their adventure.
Simple is always best!
Here is what I used to create my layout :-

13 Arts Fly Away Fleeting Moments paper
Recycled paper & cardboard
13 Arts Matte Turquoise Paint
13 Arts Metallic Blue Paint
13 Arts Gesso
Tattered Angels Glimmer Mist - Denim Blue
Tattered Angels Glimmer Mist - Sea Glass
13 Arts Splash! Multipurpose White Ink
Luminarte Twinling H20 paint - Mediterrean Blue
Tim Holtz Distress Ink Pad - Peacock Feathers
Tsukineko StazOn Permanent Ink - Jet Black
13 Arts Dots Stencil
13 Arts acrylic alphabet
Scrapberry's stamp - Wind Of Travel
Scrapberry's Kid's Fun Adhesive Crystals
Marianne Design Washi Tape - Birds
Foam tape, decorative trim, tulle
Please leave some feedback for Dorota if you are feeling inspired right now!
15 comments:
WOW! Stunning layout Dorota!
And thank you for the great tutorial!
Loved your photo tutorial Dorota, always great to see how we all do things slightly different. Really enjoyable. Thanks so much for sharing. Cheers Di
Your Layout is absolutely beautiful! Thanks so much for sharing the tutorial! Hugs, my friend!
Eu simplesmente adoro o trabalho de Dorota...todo ele...visito sempre seu blog para me inspirar!
Este LO ficou fantástico, tão simples e perfeito!
Abraço e obrigada pela inspiração!
Marlei
Simply stunning layout and I loved your tutorial! Thank you so much!
J'aime vraiment la douceur qui se dégage de cette page et merci pour le tuto!
magnifique , I loved your tutorial! Thank you so much
Tfs Dorota!! Beautiful!
Gorgeous work, thanks for the instructions.
ONe of my fave layouts for this reveal. Just love Dorota and I love the step by step.
Wow, great tutorial, beautiful page! Thank you!
Fabulous tutorial! Thank you so much for sharing!
Stunning layout and fantastic tutorial, Dorota :)
Beautiful page and fantastic tutorial Dorota!! TFS! xx
Wonderful tut Dorota! absolutely adore the finished layout, looks fantastic! Thank you so much for the step-by-step! xxx
Post a Comment