Showing posts with label Guest Educator. Show all posts

Thursday 24 April 2014

April Guest Educator - Debbie Burns of USA!


Hello again everyone!  How are you all today?  Things are going SO WELL this month at Scrap Around The World - we are sitting on EIGHTY ENTRIES so far this month!  Woohoo & thank you!!  It makes me VERY HAPPY when all we do here is appreciated & enjoyed, & it spurs me on to keep providing inspiration for the worldwide scrappy community so thanks peeps!!

This month we welcome Debbie Burns as our Guest Educator!  Debbie has played along with us a few times & creates very pretty canvas works, one of which we are showcasing here today.  Last month Debbie was placed 2nd on our Wall of Fame & the month prior (February) her lovely work caught our eye & she was selected as a future educator.

So here she is!


Hi everyone, Debbie here with you today!  
What a thrill to be invited as Guest Educator for Scrap Around The World
 & to share with you my techniques in creating a canvas!


I live in a small rural town in the state of Maryland, about an hour's drive from Washington, DC. I've been scrapbooking for 14 years & love the creative side of me that translates into my projects. Last year I tried my hand at creating using a canvas along with mixed media & fell in love with the craft. There are no boundaries & the sky is the limit! You can see more of my work on my blog http://lovelifeslittlepleasures.blogspot.com/.  I would love a visit!!


1.  I started with a 9 x 12 canvas &randomly added some
 torn stripes of paper from Bo Bunny's Country Garden.


2.  I then covered the canvas with some gesso & after it
 dried I colored some of the canvas with crayon pastels, 
gelatos & randomly added some drywall tape then
 stenciled using modeling paste &various masks.


3. I wasn't thrilled with the crayon pastels, thinking the 
colors looked washed out, so I added some more gesso
followed by some water colors & pastel inks.  Lastly
 I randomly stamped using various stamps.


 4.  Next I tore some strips of washi tape, placed them
 on the canvas then covered them lightly with gesso.


5.  I then added some more stenciling using the Tim Holtz 
Doily mask together with some modelling paste then 
inked over it once dry, using some cream ink.


6.  Lastly I added my flowers & embellishments & was done!


Here are a few close ups.  
Why not give a canvas a try? 
 As you can see it's really not that hard when broken down
 into simple steps is it?  SATW allows canvases 8 x 8 inches or larger.


A lot of older paper collections can be transformed
 using a light layer of gesso & some misting or inking.


Supplies used :-


9x12 canvas
Stencils/Masks: Tim Holtz, The Crafters Workshop
Gesso, Modelling Paste
Prima Chalk Fluid Ink
Drywall Tape
Watercolor Paints
Pastel Crayons
Washi Tape
Stamps - My Mind's Eye, Kaisercraft, Prima
Faber Castell Gelatos
Bo Bunny Country Garden papers & embellishments
Prima Flowers


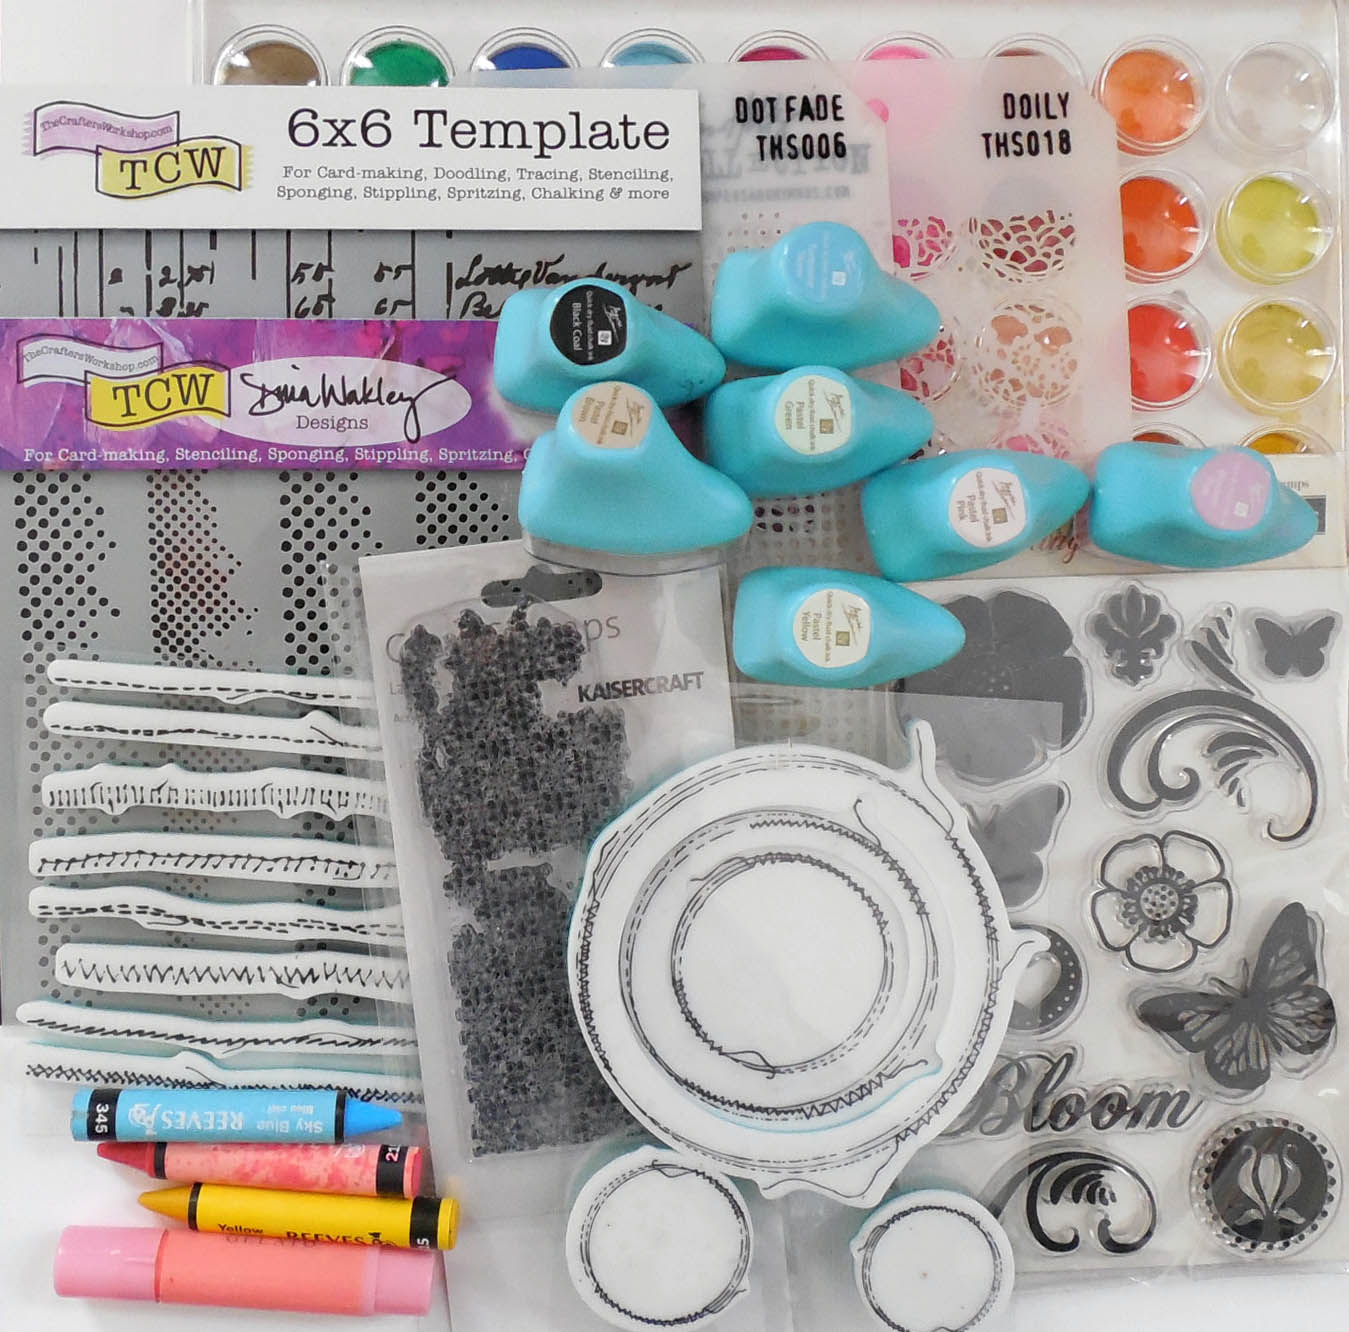
Ooooh just look at all those yummy supplies!! 
 Makes my heart do a little flippity flip! 
 You can keep the shoes - just give me the stamps!!!

THANK YOU DEBBIE for creating this beautiful piece especially 
for us this month!  Please remember to leave some encouragement
for Debbie as she ventures (very successfully) into this new realm
of mixed media canvas making!!  

Just  ONE WEEK LEFT to enter our challenge this month so
come along anyone that's been too busy.  Just get cracking
& hopefully with all the inspiration you find here the ideas will
flow!  See you all soon with a VIDEO TUTORIAL up next!!


Monday 24 March 2014

March Guest Educator - Leila Cardoso of Brazil with a Video Tutorial to share!


Hi Everyone!  Today we welcome one of our players, Leila Cardozo
 to Scrap Around The World, to share a video tutorial with us on 
how she typically puts her layouts together.Her January entry really 
caught our eye so we invited her to join us as our March Guest Educator. 
 Welcome Leila!


"Hi Everyone!  I am Leila & I am married to Marcelo & mother to Maria Clara
 & Matthew, who are all my greatest sources of inspiration.  I am absolutely 
addicted to scrapbooking, which has also become my therapy.  I love the time
 I spend creating & began in November 2010 & haven't stopped since!  I try to 
scrap every day if I can as I love it so much!!  I would love it if you could
 come & visit my blog HERE & subscribe to my Youtube channel HERE.


Leila used our current March Mood Board to create her beautiful page!


You can also see our fabulous mid-month reveal HERE too.


You still have a week left to enter this challenge so why not watch Leila's quick 3 minute video
 to harness that mojo & whip up a creation to enter? !  Thanks Leila!  Remember to leave 
some comment love for Leila - this is her first video & she has done an awesome job of it!!


Monday 24 February 2014

February Guest Educator - Rikki Graziani from Australia with an AMAZING!! Background Technique Tutorial.


Hi Everyone!  Today we welcome one of our players, Rikki Graziani to Scrap Around The World, 
to share a technique tutorial with us on how she creates her amazing backgrounds.
Her December entry really caught our eye so we invited her to join us as our
February Guest Educator.  Welcome Rikki!


"Hi!  Rikki here & I am thrilled to have been invited as a Guest Educator at Scrap Around The World! 
Thank you so much for the opportunity & I hope I inspire you with my technique.
I live in Mandurah, Western Australia, with my hubby, our 3 beautiful kids, our dog & two bunnies. 
I am a very lucky to be a stay at home mum & have been scrapping since I was 16 years old.
 I am currently on several design teams, namely Molossi, Sawyer’s Place, 
White with One, Scrap the Boys & Scrap it with attitude.  

I have been published many times both in Scrapbooking Creations & Scrapbooking Memories, 
where I was very honoured to have one of my layouts featured on the front cover.
I love participating in challenges, especially mood boards as sometimes I can be quite
 colour challenged.  My pages vary a lot ~ I can’t go past a bit of fussy cutting 
& at the moment my latest love is mixed media."
You can see more of my work on my blog & Facebook page."


1.  Using a large 12 inch , mask mist your paper with the contrasting colours starting with the lightest
 colour first. Once your happy with the result set aside to dry, or use your heat gun to speed up
 the process.  To stop your cardstock from warping, dry the front & back alternately as you go.


2.  Using Stazon/archival ink, stamp over your misted background with your script
& music note stamps.  Don't use a stamping block as holding the stamp in your
hands makes for a freer look.  Use a brick stamp around the edge of your layout.


3.  Choose  6 inch mask to add some more background design, randomly around your page, 
using texture paste.  Overlap the mask with the edges of your layout too so you can go right 
over the edge with your design.  Dry off with a heat gun or overnight/a few hours.


4.  Using a pipette or dropper, add large splashes with Heidi Swapp Colorshine – Gold Lame. 
I have added mine in a diagonal pattern starting in the bottom right hand up to the top left hand. 
Allow to dry naturally as using a heat gun will manipulate the mist into different shapes.  
If you are in a hurry try blowing gently on the back with your heat gun.


5.  Stand back & admire your background - you did it!!


6.  To finish off the background add some stamped butterflies (using black ink)
approximately ¾ of the way on the layout as if they are flying up the page.
Remember this can be chalk ink now as you are not adding any more 
layers of medium.


7.  Complete your layout using photos, patterned papers & embellishments


I used metallic gold cardstock, die-cuts & doilies to match my page.


8.  Don't forget to add a title and/or journaling.


SUPPLIES USED:-
Tattered Angels Mist – Deep Plum, Black Cherry, Cupid.

Heidi Swapp Color shine – Gold Lame

Stazon ink– Black

Jo Sonja’s – Texture Paste

Prima Marketing – mini stamps (brick wall x2)
         12 inch Template (Swirls)

Script & music note stamps – Stash

Butterflies stamps – UNITY 

Crafters Workshop 6 inch Triangle Mask

Crate paper - Flea Market tags & Ephemera Pack

Pink Paislee – Prairie Hill Bitty Blocks Alphas

Paper Doily - stash


WOW!!!!  Thanks so much Rikki for sharing with us!

How AWESOME is that background & what a top-notch tutorial Rikki prepared for us!!
  Thank you!  Thank you!!  Please leave some comment LOVE for Rikki if you agree!!!

  Here's a reminder of our FEBRUARY MOOD BOARD that so clearly inspired Rikki.
There's still TIME for you to enter - just 4 days mind!  So if you haven't got your entry
 in NOW'S THE TIME!!  We've had a boat-load of inspiration this month, from our
 Design Team, Guest Team & Guest Designer so track back the blog if you are
 looking for your mojo.  You're sure to find it here :)

  The current challenge is located HERE and HERE (our mid-month reveal).


Friday 24 January 2014

Guest Educator Sarah Groen {from New Zealand} with a Background Technique Tutorial!


Hi everyone!  Today we welcome one of our regular players, Sarah Groen, from Auckland {New Zealand}, 
to share with us a Graphic Gelato Background Tutorial.  Oooooh sounds exciting!!!


"Hi everyone :)   I am thrilled to have been invited as a Guest Educator
 at Scrap Around The World! Thank you so much for the opportunity.
I live in Auckland, New Zealand, with my hubby of 23 years & my 6 gorgeous kids. I am a stay at home mum & since I discovered scrapbooking I have been hopelessly addicted!  I am currently on the design team for the NZ scrapbook store Scottie Crafts, the on-line challenge blogs CSI, Stuck Sketches & 1,2,3 Challenge blog  & the Australian chipboard manufacturers 2 Crafty.  I have been published many times both in NZ & overseas & in 2009 I was chosen as an Elite Team member for Up2Scrap, New Zealand's premiere scrapbooking magazine.
I love participating in challenges as I find that they make me think outside the box & push me out of my comfort zone. My pages have an artsy, whimsical feel to them but I love to try out new techniques & my style changes according to my inspiration, most of which  I find online. {So many amazing artists out there!}"
 You can see more of my work at my blog:
The technique I'm going to show you was inspired by the amazing Leanne Pearce.
{http://thepaintbrushgoesspottie.blogspot.co.nz/}


1.  Using a compass to draw 2 sets of concentric circles onto a sheet of white cardstock.


2.  Draw several equally spaced radii through the circles with a pencil as shown above.
You will need a protractor for this {mark 90 & 45 degree angles}.


3.  Doodle arrows, triangles & doodles along your previously drawn lines.


4.  Colour in random sections of your circles, using gelatos 
{choosing colours that co-ordinate/complement the photo you plan to use}.


5.  Smudge the colours with your finger, to smooth/blend them together.


6.   Add more colour until you are happy with the result 
then add a few sprays of mist as shown above.


7.  Allow to dry completely before dripping a few blots of black ink randomly around your page. 
This will give depth &contrast to your background. 


8.  Finally build up your layers of patterned paper, stickers 
& embellishments, add your photo & you are DONE!

Thanks for checking out my tutorial.
 I hope that you have been inspired to give this technique a go yourself. 
It really is quite simple to do & can be adapted to suit almost any photo or theme.

--------------------------------------------------------------

I agree!  THANK YOU Sarah for sharing with us!
Now that I see all the steps it actually looks quite easy!!
I can't wait to try it out for myself soon & get those gelatos to work!!!

THANKS TO ALL WHO ENTERED OUR BLOG LOVIN' GIVEAWAY ON OUR FACEBOOK PAGE.  
The WINNER will be announced over the weekend {on Facebook} so sign up by liking our page HERE
 if you haven't done so already.  We always have something exciting going on there - almost daily!
KEEP A LOOK OUT - you never know when we just might be having ANOTHER giveaway :)


You still have ONE FULL WEEK to enter our current challenge HERE .  We have loads of inspiration for you, so scroll back through January & check out our mid-month reveal & our Guest Design Team & Guest Designer inspiration too - the inspiration NEVER ENDS here!

If you love this blog as much as me {okay I guess I am just a little biased LOL} then PLEASE LEAVE A COMMENT for Sarah, who put together this tutorial especially for your enjoyment & inspiration.  

Thanks for stopping by today!
{ and special thanks to Leonie Neal-Dawson for her assistance}


Tuesday 24 December 2013

Guest Educator Corinne de France {aka March} with a Tag Tutorial!


Hi everyone!  Christmas is almost upon us so I am taking the opportunity 
to say MERRY CHRISTMAS to all who celebrate the birth of Jesus!!


If you are here today you are EXTRA AWESOME because it is the day before Christmas!
You should be baking gingerbread, etc, etc!!  Because we don't want to keep you long 
away from your loved ones we are sharing a TAG TUTORIAL today.  Tags are
quick & easy to make yet capable of giving you a QUICK CREATIVE FIX!!

*Remember we are allowing TAGS this month to help you create
 FASTER
over this busy festive period!  This month only though!!*


Today we welcome a very special lady - Corinne de France aka March,
to share a tag with you, made especially for us at Scrap Around The World.

Corinne has participated in EVERY SINGLE CHALLENGE we have ever held
 - all EIGHT so far - so for that she is definitely EXTRA AWESOME!!
Here she is!...

I am very thrilled & rather nervous, but also very proud, that 
Scrap Around the World has noticed my work & asked me 
to present a tutorial.  I am so excited for this opportunity! 

I am the mum of an adorable young girl who is the source of my
 inspiration, & I have a great husband who understands & accepts 
my passion.  I love all styles but I discovered mixed media 2 years
 ago & now I incorporate it into all my layouts & art journal pages.

I often also work with images or postcards brought back from my
 travels with my husband. I also love street art.  I live with my family
 in Lyon  which is a city in east-central France, situated between 
Paris & Marseille by the Mediterranean. 

I've just joined the team l'antre Scrap, who noticed my work & asked 
me to join them.  My blog is in French, but as art is universal I hope
 you will like what you see & become a follower if you do!

You can find it here...


1.  Distress the edges of your tag.


2.  Separate the layers of your paper napkin.


3.  Tear off the parts you want to use & position them on your tag.


4.  Paste down using gel medium or liquid glue & heat gently to dry.


5.  Apply gesso through a stencil, heating gently to dry off.
{This is a SPRAY GESSO - how awesome is that?!?}


6.  Using another stencil, apply thick gel medium then heat gently to dry off.


7.  Spray a concentrated amount of ink onto one particular area of your tag.


8.  Apply a light layer of gesso to a stamp, using a
 brush & stamp with it then heat gently to dry off.


9.  Use your fingertips to gently wipe acrylic paint onto the area of 
gel medium that is raised & dried, in order to highlight the design.


10.  Thoroughly dry off your tag & enjoy admiring 
your design!  Your tag is now complete!!

THANK YOU Corinne for a TOTALLY AWESOME tutorial!
So creative & artistic I am dying to try it out myself!

If you LOVED this tutorial as much as I did please
let Corinne know by leaving a comment, I'm sure
she would really appreciate hearing from you!

Lastly, if you are not a follower of Scrap Around The World,
on FACEBOOK, please sign up HERE & follow the instructions
to take part in our HUGE FACEBOOK SUBSCRIBER GIVEAWAY!


Our December challenge is STILL OPEN!

It is closing on the last day of the month
 {31st December 2013}at midnight EST
  Click HERE for details!!