Hi everyone! Today we welcome one of our regular players, Sarah Groen, from Auckland {New Zealand},
to share with us a Graphic Gelato Background Tutorial. Oooooh sounds exciting!!!

"Hi everyone :) I am thrilled to have been invited as a Guest Educator
at Scrap Around The World! Thank you so much for the opportunity.
I live in Auckland, New Zealand, with my hubby of 23 years & my 6 gorgeous kids. I am a stay at home mum & since I discovered scrapbooking I have been hopelessly addicted! I am currently on the design team for the NZ scrapbook store Scottie Crafts, the on-line challenge blogs CSI, Stuck Sketches & 1,2,3 Challenge blog & the Australian chipboard manufacturers 2 Crafty. I have been published many times both in NZ & overseas & in 2009 I was chosen as an Elite Team member for Up2Scrap, New Zealand's premiere scrapbooking magazine.
I love participating in challenges as I find that they make me think outside the box & push me out of my comfort zone. My pages have an artsy, whimsical feel to them but I love to try out new techniques & my style changes according to my inspiration, most of which I find online. {So many amazing artists out there!}"
You can see more of my work at my blog:
The technique I'm going to show you was inspired by the amazing Leanne Pearce.
{http://
{http://

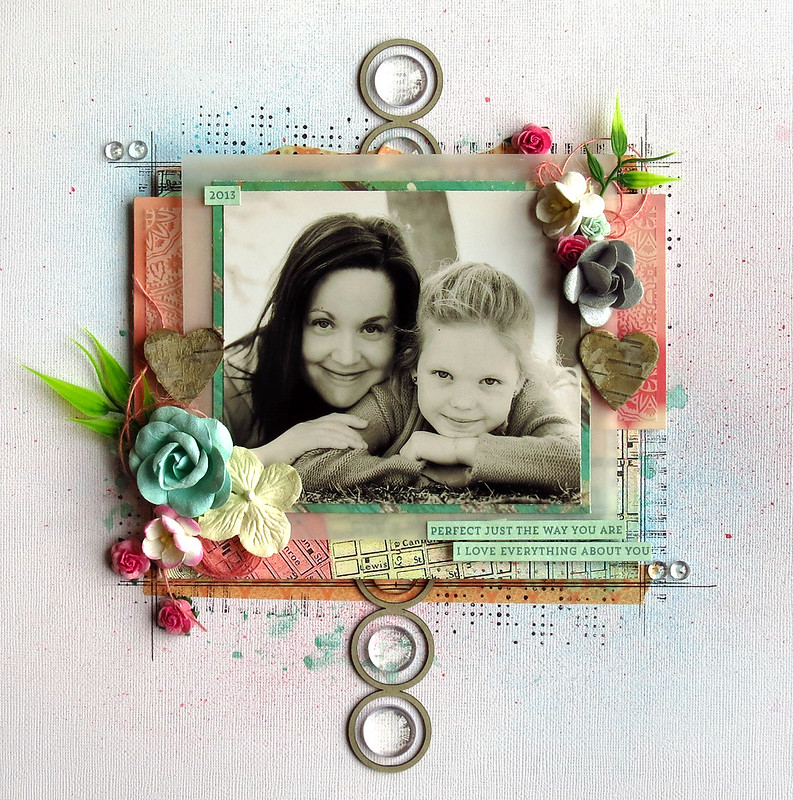
1. Using a compass to draw 2 sets of concentric circles onto a sheet of white cardstock.

2. Draw several equally spaced radii through the circles with a pencil as shown above.
You will need a protractor for this {mark 90 & 45 degree angles}.

3. Doodle arrows, triangles & doodles along your previously drawn lines.

4. Colour in random sections of your circles, using gelatos
{choosing colours that co-ordinate/complement the photo you plan to use}.

5. Smudge the colours with your finger, to smooth/blend them together.

6. Add more colour until you are happy with the result
then add a few sprays of mist as shown above.

7. Allow to dry completely before dripping a few blots of black ink randomly around your page.
This will give depth &contrast to your background.

8. Finally build up your layers of patterned paper, stickers
& embellishments, add your photo & you are DONE!
Thanks for checking out my tutorial.
I hope that you have been inspired to give this technique a go yourself.
It really is quite simple to do & can be adapted to suit almost any photo or theme.
--------------------------------------------------------------
I agree! THANK YOU Sarah for sharing with us!
Now that I see all the steps it actually looks quite easy!!
I can't wait to try it out for myself soon & get those gelatos to work!!!
THANKS TO ALL WHO ENTERED OUR BLOG LOVIN' GIVEAWAY ON OUR FACEBOOK PAGE.
The WINNER will be announced over the weekend {on Facebook} so sign up by liking our page HERE
if you haven't done so already. We always have something exciting going on there - almost daily!
KEEP A LOOK OUT - you never know when we just might be having ANOTHER giveaway :)

You still have ONE FULL WEEK to enter our current challenge HERE . We have loads of inspiration for you, so scroll back through January & check out our mid-month reveal & our Guest Design Team & Guest Designer inspiration too - the inspiration NEVER ENDS here!
If you love this blog as much as me {okay I guess I am just a little biased LOL} then PLEASE LEAVE A COMMENT for Sarah, who put together this tutorial especially for your enjoyment & inspiration.
Thanks for stopping by today!
{ and special thanks to Leonie Neal-Dawson for her assistance}


.JPG)