Hello again! It's Heather McMahon back with you today to share an amazing
wooden board project by Design Team member Nicole Doiron from Canada.
Wooden boards are now welcome in Scrap Around The World projects.
Nicole was inspired by all the sea elements in the current mood board, including
the warm colours, the mysterious sea creatures & the overall summer feel.
Let's hear a little about Nicole...
"My name is Nicole & I'm from New Brunswick, Canada. I share a home with my
boyfriend of 9 years (& fiance of 6 years!), Yves, & our furry baby, Sugar the cat.
I've been scrapbooking since 2005 & blogging since 2011.
Scrapbooking is not just a hobby for me, it's a passion!
I love creating in a shabby chic style with touches of mixed media.
I often use a lot of embellishments including chipboard, tags & twine,
eyelets & brads, & many flower clusters on my creations.
I often use a lot of embellishments including chipboard, tags & twine,
eyelets & brads, & many flower clusters on my creations.
Here at Scrap Around the World I am a Canvas Specialist, as well as
being the Guest Coordinator, which means I deal with the Guest Design
Team post each month. You can find my blog, Scrap Utopia HERE & my
Facebook Artist page HERE, Pinterest HERE & Instagram HERE.
I hope you enjoy my tutorial this month, based on Hera's gorgeous mood board."
being the Guest Coordinator, which means I deal with the Guest Design
Team post each month. You can find my blog, Scrap Utopia HERE & my
Facebook Artist page HERE, Pinterest HERE & Instagram HERE.
I hope you enjoy my tutorial this month, based on Hera's gorgeous mood board."
----------------------------------------------------------------------
1. Coat a 12" x 8" wooden plank frame with at least 3 thick coats of
white gesso or white acrylic paint. I bought my frame at my local Dollar Store.
white gesso or white acrylic paint. I bought my frame at my local Dollar Store.
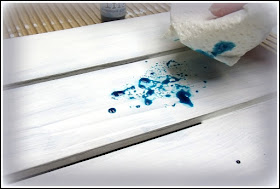
2. When the gesso is completely dry, use different shades of distress inks & spread
them across the background using a scrunched up paper towel.
them across the background using a scrunched up paper towel.
3. You will see that the texture of the paper towel transfers onto the background.
The splatters look like they came from a mist bottle but, unlike mist, the
ink patterns are much easier to control when applied in this way.
4. Add some more texture using thick modeling paste & a stencil.
5. Mist a few brown & beige hues of mists to add some more earthy tones.
Dry with a heat gun, making sure to move the liquid ink with the hot air
to create swirly effects, using the nozzle to direct your wet media.
6. Add a few more drops of 'Stormy Sky' Distress Ink & brush it in
thick vertical strokes with a foam brush already coated with a thin
layer of white acrylic paint. This will help the sea blue to pop more.
thick vertical strokes with a foam brush already coated with a thin
layer of white acrylic paint. This will help the sea blue to pop more.
7. To achieve the sea foam effect on the 2 Crafty Surfy Wave chipboard
pieces, add a thick coat of clear gesso & heat with a heat gun until it bubbles.
Add a generous coat of Sparkle Texture paste then dab with the same blue
distress inks that were used on the background. Add some white paint to
the tips & Silks acrylic glaze on the bottom edge.
pieces, add a thick coat of clear gesso & heat with a heat gun until it bubbles.
Add a generous coat of Sparkle Texture paste then dab with the same blue
distress inks that were used on the background. Add some white paint to
the tips & Silks acrylic glaze on the bottom edge.
8. Affix the picture & all embellishments to the boards.
Use a sponge dabber soaked in white acrylic paint to dab over everything,
even the edges of the picture. This adds a beautiful white-washed effect.
You can see here how the whitewashing effect softens the
project & provides cohesion across the different elements.
project & provides cohesion across the different elements.
Nicole's work on those Surfy Waves creates such an intriguing look!
The detail on the background is subtle enough to not overpower the work yet
strong enough to help add a great amount of interest to the overall project.
Here is Nicole's finished wooden board.
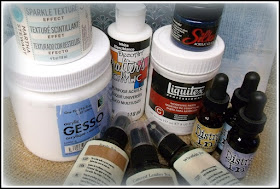
Here are the exact products Nicole used to create her project.
SUPPLIES LIST
Wooden board frame
Acrylic Gesso - Art Alternatives
Acrylic Gesso - Art Alternatives
Professional Modeling Paste & Clear Gesso - Liquitex
White paint - DecoArt Crafter's
White paint - DecoArt Crafter's
Stencil - Prima Marketing Inc.
Sparkle Texture Effect - Martha Stewart
Tim Holtz Distress Ink - Ranger
in Stormy Sky, Tumbled Glass & Scattered Straw
Sprays - Tattered Angels Glimmer Mist
in Suede, Tattered Leather & Wheatfields
Acrylic Glaze - Silks Azurite
Chipboard - 2Crafty Surfy Waves, Chain Lengths,
Line Words, Summer Borders & Seashells
Line Words, Summer Borders & Seashells
Shabby Chic Treasures - Prima Marketing Inc.
Floral Embellishments - Recollections
Charms - Cousin Designs By Me
Netting & cheesecloth
Please leave a comment here for Nicole if you found this tutorial inspiring
& remember that every comment you leave puts you in with a chance to
win our random Followers' Prize!
Remember there is only 1 week left to get your entries in for this month's
Remember there is only 1 week left to get your entries in for this month's
challenge & there are 12 awesome prizes up for grabs so be quick!
You can find the challenge details here.
Complied & posted by Heather McMahon
You can find the challenge details here.
Complied & posted by Heather McMahon

.JPG)

%2B-%2BCopy.jpg)


Gorgeous project! Thanks a lot for the tutorial!
ReplyDeleteThis is so beautiful Heather! I LOVED it totally! <3
ReplyDeleteGreat textured, this is an amazing creation !
ReplyDeleteA brilliant project Nicole! Thank you for an awesome tutorial xx
ReplyDeleteThanks for the tutorial! Try to do smth like this:))
ReplyDeletefantastic tutorial!!...I love the idea with the wooden plank...
ReplyDeleteAwesome project and a great tute!!
ReplyDeletemy goodness this is awesome and so beautiful!!! thanks for the amazing tutorial!!!!
ReplyDeleteAbsolutely gorgeous - I love the colors, textures and embellies - wow!
ReplyDeleteWow, it's so oryginal! I like it :))
ReplyDeleteWhat an amazing project Nicole! You sure nailed the mood board!
ReplyDeleteJust beautiful! Love all the colors you used.
ReplyDeleteAwesome tutorial Nicole! Love your design!! Thanks for sharing! <3
ReplyDeleteThank you Nicole! Stunning project!
ReplyDeleteStunning canvas Nicole! Thank you so much for sharing the tutorial! :)
ReplyDeleteGreat job putting this together Nicole & Heather!! Impressive!!!
ReplyDeleteBeautiful waves! Fantastic job :)
ReplyDeleteOh my Nicole this is stunning, thank you for sharing
ReplyDelete