
Hi Everyone!
Starting this month on the 24th & 28th of each month we will be highlighting 2
members of our Design Team in a series call " Design Team Moment To Shine".
We hope to inspire YOU in a BIG way through this series!
Today we have a step-by-step photo tutorial by Design team member
Anna Rogalska, from Poland, inspired by our current challenge HERE.

Anna Rogalska, from Poland, inspired by our current challenge HERE.

Hello! My name is Anna Rogalska. I live in Poland & work as a garden designer.
I've been scrapbooking for nearly 6 years. My scrapping style is romantic,
a little shabby & I love mixed-media. I am definitely a flower addict!
My favourite forms are layouts, cards & tags. I love to collect inks, paints,
mists & masks to use in my work. You can find my blog here.
I've been scrapbooking for nearly 6 years. My scrapping style is romantic,
a little shabby & I love mixed-media. I am definitely a flower addict!
My favourite forms are layouts, cards & tags. I love to collect inks, paints,
mists & masks to use in my work. You can find my blog here.

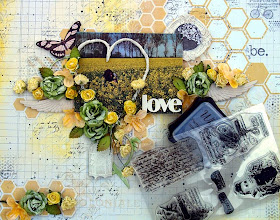
For the June reveal I only showed you a sneak peak of the layout
I created from Di's June Mood Board so here is THE FULL REVEAL!
I created from Di's June Mood Board so here is THE FULL REVEAL!

Now I will show you how to achieve this for yourself :)
STEP 1
Cover your page with a thin layer of gesso & let dry
naturally or dry off using your heat/embossing gun.
Choose papers & layer them in the order you want them to
appear on your page. Glue the papers. Use stamps randomly.
naturally or dry off using your heat/embossing gun.
Choose papers & layer them in the order you want them to
appear on your page. Glue the papers. Use stamps randomly.

STEP 2
Using your mask apply a thick layer of texture paste randomly, in various
areas on your page & let it dry, either naturally or using your heat gun.
To apply texture paste you can use an old credit card or similar.
areas on your page & let it dry, either naturally or using your heat gun.
To apply texture paste you can use an old credit card or similar.

STEP 3
Start applying yellow mists randomly.
Add water if desired & allow the colour to spread & form patterns.
Add green chalk ink to chipboard. Allow to dry completely.

STEP 4
Once dry, add small splashes with black & white gesso.
Add a few paper flowers.
Wait for everything to be thoroughly dry or dry off with your heat gun.

STEP 5

STEP 6
Apply text stamp randomly. Don't use a stamping block as
holding the stamp in your hands makes for a freer look.
{stamps come from 7Dots Studio - Cold Country Collection HERE}
(7Dots Studio is one of our 2014 Major Sponsors. You can find a list
of retailers on the 7Dots Studio site & purchase from your nearest store
OR directly from them IF there is no supplier in the country you live.)
STEP 7
Add more yellow color using a mist & yellow paint with white gesso.
You can blot off excess with a paper towel. Add stickers with subtitles.

STEP 8
Complete your layout using more flowers, chipboards
(butterflies), pearls & adding more mists if desired.

Your layout is done!


STEP 6
Apply text stamp randomly. Don't use a stamping block as
holding the stamp in your hands makes for a freer look.
{stamps come from 7Dots Studio - Cold Country Collection HERE}
(7Dots Studio is one of our 2014 Major Sponsors. You can find a list
of retailers on the 7Dots Studio site & purchase from your nearest store
OR directly from them IF there is no supplier in the country you live.)

STEP 7
Add more yellow color using a mist & yellow paint with white gesso.
You can blot off excess with a paper towel. Add stickers with subtitles.

STEP 8
Complete your layout using more flowers, chipboards
(butterflies), pearls & adding more mists if desired.


A few close ups . . .

You can see that I love lots of detail!

{Oh my goodness I just adore Anna's work don't you? WOWZERS!!}

What do we need?
A photo :) papers, stickers, flowers, embellishments, chipboard,
inks, gesso, modelling paste, mists, paints, mask, & stamps.
inks, gesso, modelling paste, mists, paints, mask, & stamps.

Supplies List
Papers - My Mind's Eye -Follow Your Heart
Word Stickers - 7 Dots Studio - Illumination
Stickers - Papirdesign
Pearls - Papirdesign
Chipboards- Scrapmatts
Stickers - Papirdesign
Pearls - Papirdesign
Chipboards- Scrapmatts
Chipboard 'Love' - Wycinanka
Clear Stamps - Kaisecraft
Clear Stamps - 7 Dots Studio - Cold Country
Resin Embellishments - Prima
Mask/Stencil - Prima
Chalk Inks - Ingvild Bolme - Prima
Black Gesso - Claudine Hellmuth Ranger
Gesso- 13arts
Acrylic Modeling Paste - 13arts
Pastel Mists - 13arts
I have also prepared a slideshow for you
to watch, with more pictures HERE.
I hope you enjoyed my page & if you follow my tutorial please leave
me a comment on my blog so I can come & visit you to see how
yours looks!! Anna x
Thank you so much Anna!
You certainly inspired ME & many others
of that I'm sure! Please leave Anna some
comment ♥ if you are feeling inspired right now!
Gorgeous layout, Anna and thanks for sharing tutorial.
ReplyDeleteYour layout is seriously stunning.. what a FANTASTIC tutorial! :)
ReplyDeleteSuch amazing tutorial thank you so much ANNA!!! <3
ReplyDeleteAbsolutely fabulous layout!!! Great tutorial Anna, thanks!!
ReplyDeleteSeriously stunning layout, Anna....thank you for sharing your process with us all :))
ReplyDeleteThanks for sharing. I'll have to give it a go!
ReplyDeleteStunning tutorial! I totally love it!!
ReplyDeleteGorgeous layout!! Thanks for the tutorial. I'm always afraid to reuse mist after my page is finished.... must try this!
ReplyDeleteBeautiful layout Anna and such a great tutorial too. Thanks so much for sharing it with us all. I am always a great fan of your fabulous work. TFS. Cheers Di
ReplyDeleteThis is stunning! Great tutorial!
ReplyDeleteFabulous tutorial and such a gorgeous page!
ReplyDeleteBeautiful page & you make it look so easy Anna! Your style is magnificent. Thank you for sharing!!
ReplyDeleteLovely layout your tutorial was great you made it look so easy I will try your technique out. x
ReplyDeleteAbsolutely AMAZING!! Wow, thanks for sharing this awesome tutorial. Gorgeous layout!
ReplyDeleteGorgeous layout!. Thank you for sharing your process, too - loved it!
ReplyDeletepiekna praca i bardzo czytelny tutorial :) dziekujemy :)
ReplyDeleteWOW! Thanks for the awesome tutorial! Always so nice to see and learn :)
ReplyDeleteOh wow Anna! this is such a fab tutorial and the layout turned out absolutely amazing! Thank you so much for sharing!
ReplyDeleteGreat tutorial. Although I never follow tutorials, I just can't do it, I love to look at the process of others. Thanks for sharing.
ReplyDeleteThank you Ladies :)
ReplyDeleteFantastic tutorial! Thaks so much for inspiring us!!!
ReplyDelete